
As you know, one of our goals is for our dolls and dioramas to have the same beautiful items we have in our homes. Glassware is a tricky one since it can’t easily be created or painted. I do plan to delve into resin experiments this summer, but who knows how that will go! In the meantime, I’ve created some decorative household items using items we should all be able to find. Read on for lots of fun ideas!
Candy Dishes

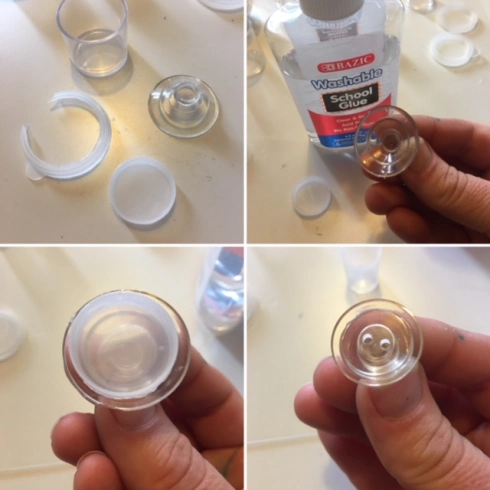
These candy dishes are reminiscent of cut glass and Grandma’s house! I have to give inspiration credit to My Small Obsession in her trash to treasure feature. I just added my touches to them. The rattle favors are from our beloved Dollar Tree!
Here’s what you will need and the visual steps to create your own:

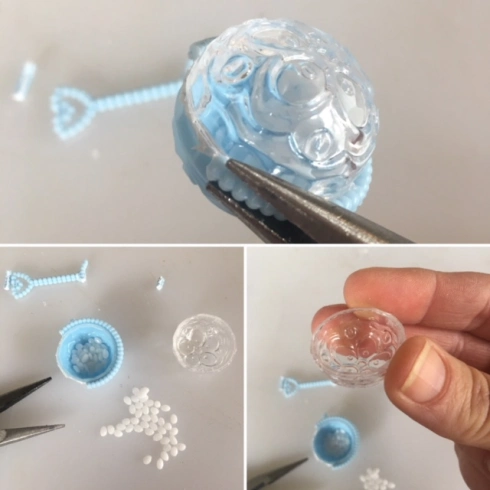


I simply glued another small crystal bead onto more domes to create a lid for the candy dish for a different look.
Apothecary jars

I’m a big fan of these in real life and wanted to be sure our little ladies could have some too! These are great for holiday decor filler and to mimic wonderful and colorful displays of candy like items.

They are great for the bathroom too to display your cotton balls and cotton swabs!
Here’s what you will need and the visual steps to create your own:

For the larger jars I used the glass jars shown above.
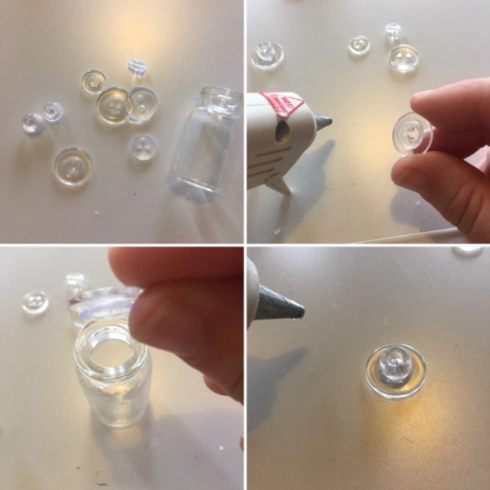

For the bathroom jars I used hair spray caps for the body of the jars.


Tip: Plain clear buttons aren’t always the easiest to find in stores, but if you keep all of the extra buttons from your clothing and garments, I bet you have quite a selection. If you are looking for larger ones, check the inside of your coats and jackets.

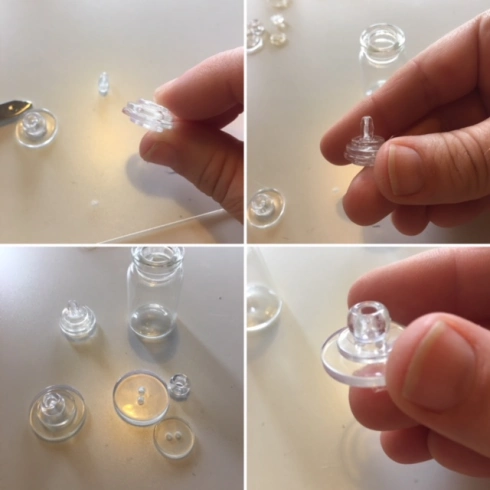
Kitchen Canisters

For these fun Kitchen canisters reminiscent of classic glass canisters I used suction cups for the lids (keep in mind these are the ones from the hardware store or Michael’s, they are not the ones you can find at the Dollar Tree). These suction cups have ridges that make them perfect for these lids. The container portion of the canisters are from the Dollar Tree (they have these on a regular basis) and I used another hair spray lid for the tea canister.
Here’s what you will need and the visual steps to create your own:
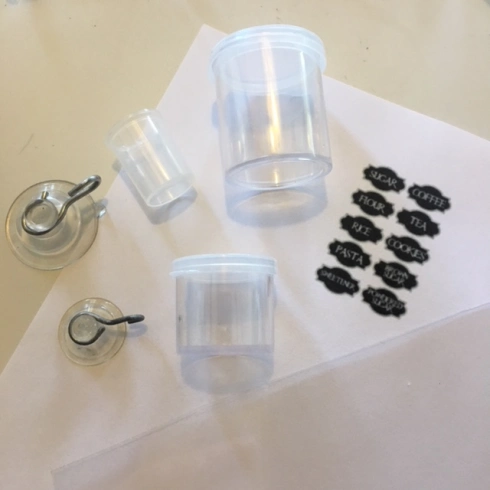


By now, I think you all know what an amazing tool our computers are for making signage and decor. I simply found a template online and shrunk it down to the right size and printed them out. Cut and Mod Podge and you have labeled canisters! Now they are ready to be filled!
Candle Pillars

These candle pillars are super easy! Just find some decorative clear buttons with some “cut glass” detail and a couple of clear pony beads and viola!
Here’s what you will need and the visual steps to create your own:

You can also use simple items to create candle pillars. Using clear plastic sewing machine bobbins is a great idea! Be sure to get the Class 15 ones though! Many have curved tops and bottoms while these are flat.

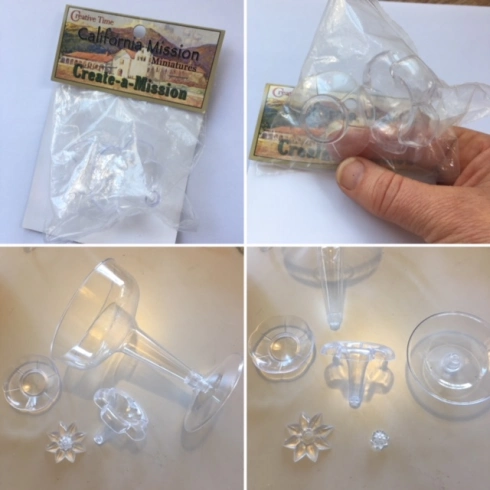
Fountain Dish & Bowl

This was a fun creation using a miniature fountain set I found in the Mission section of my arts & crafts store. I also used the base of a plastic Dollar Tree champagne glass and decorative mirror nail cover for the lower tiered bowl. The smaller bowl was just a perk of the fountain kit!
Here’s what you will need and the visual steps to create your own:

Simple Vases

I used lipstick covers from the Dollar Tree for tall glass vases and small steampunk beakers can be used for bud vases. You can also see an example of the bobbins I mentioned above.

I actually have more items to share, but this post was getting a bit long and probably shared too many items in one post! I think I bit off a bit more than I could chew in one post! These photo tutorials are extremely time consuming!
As always, thank you for stopping by! I hope you gained some inspiration and are ready to rummage through your spare buttons and plastic and glass scraps to create some of your own glassware for your dioramas and dolls! Take these basic methods and create your own glorious glassware! Be sure to Follow us so that you receive notifications when we upload new content! Until next time…
A la prochaine
Rie & Bruni


I ❤️ ❤️ ❤️ your tutorials!!! Thanks for sharing!
LikeLiked by 1 person
This is so cool! I’ll try it out some time.
LikeLiked by 1 person
Thanks! You should! 🙂
LikeLiked by 1 person
Thanks so much for this tutorial! So useful and beautiful…I really love it! One of my dream is to create a pastry shop diorama and I think this glasswares will be perfect 😀
LikeLiked by 1 person
That sounds like a wonderful idea!! 💗
LikeLike
Wow I love it (this post is NOT loo long:)) So creative! I’ve seen these mini baby rattles, for example, but never thought they could be used candy dishes. This is why we need this blog. Thank you so much for
LikeLiked by 1 person
I didn’t finish my sentence LOL. Thank you so much for sharing :)))
LikeLiked by 1 person
Thanks! I can’t take credit for the idea completely as I noted! Just how to get them apart and add my flare! 😊
LikeLike
LOVE this! THose suction cups are perfect little lids! Great work – such an inspiration. THank you for sharing your ideas.
LikeLiked by 1 person
Thank you so much for enjoying and following! I’m really hoping to get back to more regular posts soon! 😊
LikeLike
How did you get the glue if the rattles from dollar tree? I took them apart and their still stuck together! Think they started glueing them together….
LikeLiked by 1 person
Interesting, I haven’t run across that! If there is glue residue you might be able to use acetone. 😊
LikeLike